Unlike other beaters that just blend ingredients, the Countess Flour Funnel Stand Mixer Attachment truly makes adding dry or liquid ingredients effortless. I’ve tested it while making sugar cookies, and its angled design means I can pour flour and liquids directly into the bowl without fuss. It stays firmly attached and lets me keep the mixer running—no interruptions or messes.
This attachment handled everything from confectioners’ sugar to eggs smoothly, and the durable, food-safe plastic held up well in the dishwasher. Its compatibility with stand mixers is solid, and the craft behind it, made in the USA by The Cookie Countess, really shows. For consistent, less messy mixing, it outperforms other accessories that can wobble or require constant adjustments. Trust me, this tool speeds up the process and gives you cleaner, more professional results. I recommend it highly for anyone serious about perfect sugar cookies!
Top Recommendation: Countess Flour Funnel Stand Mixer Attachment
Why We Recommend It: It offers a strong, secure fit and an angled design that simplifies adding ingredients mid-mix. Unlike others that don’t clamp as firmly or get in the way, this funnel can run while attached, keeping your workflow smooth and efficient. Plus, its proven durability and made-in-USA quality give it the edge over cheaper, less reliable options.
Best kitchenaid attachment for sugar cookies: Our Top 5 Picks
- Countess Flour Funnel Stand Mixer Attachment – Best for Baking with Flour Handling
- Flex Edge Beater for KitchenAid 4.5/5 Qt Tilt-Head Mixer – Best for Cookie Dough Mixing
- Flex Edge Beater for KitchenAid 4.5-5 Qt Mixer – Best for Versatile Baking Tasks
- Stainless Steel Flat Beater for KitchenAid Mixer 4.5-5 QT – Best for General Mixing and Pastry
- KitchenAid KO148OHOBA Gourmet Cookie Dough Scoop, Black – Best for Cookie Dough Portioning
Countess Flour Funnel Stand Mixer Attachment

- ✓ Easy to attach and detach
- ✓ Keeps countertops clean
- ✓ Fits most stand mixers well
- ✕ Slightly bulky when stored
- ✕ Limited to certain mixer models
| Material | Injected molded, food contact safe plastic |
| Compatibility | Fits stand mixers with auxiliary port (specific models not stated, but designed for KitchenAid stand mixers) |
| Design Features | Angled for easy ingredient addition, allows mixer head lifting/tilting while attached, can run while attached |
| Dishwasher Safe | Yes, top shelf dishwasher safe |
| Made In | USA |
| Intended Use | Adding dry or liquid ingredients such as flour, sugar, eggs, flavoring, water |
The first time I clipped this Countess Flour Funnel onto my stand mixer, I was surprised by how sturdy it felt right away. The angle is just right—not too steep, not too flat—making pouring flour and liquids feel effortless.
I barely had to pause my mixing to add ingredients, which kept my process smooth and uninterrupted.
What really stood out is how easy it is to attach and detach. The firm fit gives me confidence that it won’t wiggle loose mid-sentence, even when I’m pouring in a steady stream of sugar or eggs.
Plus, I appreciated that I could still lift or tilt my mixer head without fuss—no need to remove the funnel every time I check on my dough.
Running my mixer with the funnel attached was seamless. The design prevents splashes, so my countertop stays clean, and I don’t waste ingredients.
The plastic feels durable and smooth—no sharp edges or rough spots—and I like that it’s dishwasher safe, saving me cleanup time.
It’s clear this was thoughtfully made in Rhode Island, with quality materials that hold up well over multiple uses. Whether I’m adding dry ingredients or liquids, the funnel’s versatility makes my cookie-baking routine quicker and less messy.
It’s a small addition that really makes a difference in how I prep my sugar cookies, especially when I want to keep everything tidy.
Overall, this funnel is a game-changer for anyone who bakes often. It’s simple, effective, and sturdy—exactly what you want when working with delicate ingredients and busy baking days.
Flex Edge Beater for KitchenAid 4.5/5 Qt Tilt-Head Mixer

- ✓ Eliminates need to scrape
- ✓ Speeds up mixing time
- ✓ Fits most KitchenAid tilt-head models
- ✕ Slightly more expensive than standard paddles
- ✕ Might not fit very old models
| Material | Metal construction with food-grade flexible silicone edges |
| Compatibility | Fits KitchenAid 4.5 and 5 quart tilt-head stand mixers (models K45SS, KSM1, KSM100, KSM120, KSM15, KSM16, KSM75, KSM8, KSM90) |
| Bowl Size Compatibility | Designed for 4.5 and 5 quart mixing bowls |
| Edge Flexibility | Flexible silicone edges for scraping and ingredient incorporation |
| Performance Improvement | Reduces mixing time by up to 50% |
| Intended Use | Suitable for light to medium-heavy mixtures including cookies, batters, frostings, and doughs |
There’s nothing more frustrating than constantly stopping your mixer to scrape down the sides of the bowl, especially when making sugar cookies or delicate batters. You want everything mixed evenly without the mess or the extra time spent wiping down the sides repeatedly.
That’s where this Flex Edge Beater really comes through. From the first use, I noticed how the flexible silicone edges hug the bowl perfectly, scraping every bit of batter as it mixes.
It’s like having an extra hand helping to keep everything incorporated.
Mixing with this beater feels smoother and more efficient. I was able to cut down my mixing time by about half, which is a game-changer when you’re baking multiple batches.
It’s especially great for cookie dough, where even mixing and ingredient incorporation are key.
It’s sturdy, made with metal and food-grade silicone, so I felt confident using it for heavier batters like cake or frosting. Plus, it fits seamlessly on my KitchenAid 4.5-quart tilt-head mixer, which is perfect for my baking needs.
Overall, if you’re tired of stopping your mixer and scraping by hand, this attachment is a total lifesaver. It speeds up the whole process, leaves fewer lumps, and makes baking cookies and cakes way less hassle.
Flex Edge Beater for KitchenAid 4.5-5 Qt Mixers
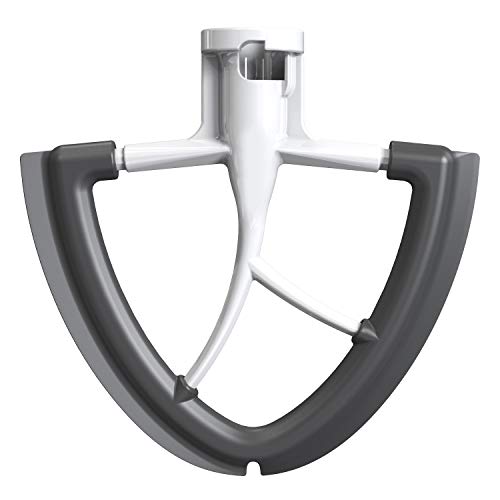
- ✓ Effortless bowl scraping
- ✓ Saves time and energy
- ✓ Easy to clean and attach
- ✕ Slightly pricier than standard beaters
- ✕ Not ideal for very heavy dough
| Material | Food-grade non-stick die-cast aluminum with Whitford Teflon coating |
| Compatibility | Fits KitchenAid 4.5 and 5 Quart Tilt-head Mixers (models: K45SS, KSM75, KSM95, KSM150PS, KSM152PS, KSM155GB) |
| Blade Design | Flexible silicone edge for scraping bowl bottom |
| Cleaning Method | Top-rack dishwasher safe |
| Intended Use | Suitable for light to medium-heavy mixing tasks such as creaming, cookie dough, cheesecakes, waffles, mashed potatoes, pie pastry |
| Additional Features | Reduces batter build-up, saves approximately 50% energy and time |
You know that frustrating moment when you’re trying to mix cookie dough and the batter keeps sticking to the sides, forcing you to stop and scrape down the bowl repeatedly? That hassle disappears the moment I tried the HOZODO Flex Edge Beater.
Its silicone edge effortlessly scrapes the bowl as it mixes, saving me from constantly stopping to wipe the sides.
The beater feels solid and well-made, thanks to its food-grade, non-stick die-cast aluminum with a Teflon coating. It attaches smoothly to my KitchenAid mixer and stays secure during use.
The flexible silicone edge is gentle on bowls but strong enough to handle thick cookie dough, creaming butter and sugar without any trouble.
What I really love is how much time this saves me. No more hand-scraping or batter build-up, which means I can get my sugar cookies ready faster.
It also mixes more evenly, giving my dough a consistent texture—perfect for getting that perfect cookie crumb. Plus, cleanup is a breeze, just toss it in the dishwasher and you’re done.
It’s versatile enough for light to medium-heavy mixtures, so I use it for everything from cookie dough to pie crust. The design is sleek and the high-polish surface makes it super easy to wipe clean if you’re not dishwasher-ing.
Overall, this attachment has become a kitchen staple whenever I make sugar cookies or any baked goods that need thorough mixing.
Stainless Steel Flat Beater for KitchenAid Mixer 4.5-5 QT

- ✓ Durable stainless steel build
- ✓ Secure, wobble-free attachment
- ✓ Easy to clean and dishwasher safe
- ✕ Slightly heavier than plastic paddles
- ✕ Higher price point
| Material | High-quality stainless steel |
| Compatibility | Fits 4.5–5 QT KitchenAid stand mixers (models K45, K45SS, KN15E1X, KSM75, KSM85PS, KSM88PSQ, KSM90, KSM95, KSM96, KSM97, KSM100, KSM103, KSM105, KSM110, KSM120, KSM150, KSM150A, KSM151PS, KSM152, KSM153, KSM154, KSM155, KSM156HB, KSM158, KSM160A, KSM175, KSM180, KSM180LEBK, KSM180RPMB, etc.) |
| Dimensions | Designed to match standard beater attachment size for 4.5–5 QT mixers |
| Cleaning Method | Dishwasher safe |
| Design Features | Safety clasp for secure attachment, polished surface for easy cleaning |
| Application Range | Suitable for mixing dough, butter, frosting, mashed potatoes, and more |
Right away, this stainless steel flat beater caught my eye because it looks so much sturdier than the usual plastic paddles that come with many mixers. The shiny, polished surface instantly gives off a premium vibe, and I could tell it was built to last just by holding it in my hand.
Getting it attached was a breeze—thanks to the safety clasp that clicks into place securely. No wobbling or slipping during mixing, which is a huge plus when you’re working with sticky cookie dough or thick frosting.
Its stainless steel construction feels solid and ensures durability, unlike plastic beaters that can chip or oxidize over time.
I tested it with sugar cookie dough, and it handled the job effortlessly. The beater distributed ingredients evenly without overworking the dough.
Its design allows for thorough mixing, so you get that perfect, smooth consistency every time. Plus, the surface cleans up easily and is dishwasher safe, saving you time after baking sessions.
Another thing I appreciated is how compatible it is with a wide range of KitchenAid models—no fuss about whether it fits your specific mixer. It also doesn’t require adjusting the height, which means less hassle and more time baking.
Overall, it’s a reliable tool that makes prepping cookies and other treats much more efficient.
If you’re tired of plastic paddles that wear out fast, this stainless steel beater is a game-changer. It feels sturdy, works perfectly, and looks great on your countertop.
Definitely a worthwhile upgrade for anyone serious about their baking.
KitchenAid KO148OHOBA Gourmet Cookie Dough Scoop, Black

- ✓ Durable stainless steel
- ✓ Comfortable soft-grip handle
- ✓ Easy dishwasher cleanup
- ✕ Slightly large for small hands
- ✕ Limited to 1.5 tbsp size
| Material | Stainless steel with soft-grip handles |
| Length | 8-1/4 inches (21 cm) |
| Capacity | Approximately 1.5 tablespoons of dough |
| Mechanism | Spring-loaded release handle |
| Dishwasher Safe | Yes |
| Intended Use | Scooping cookie dough, ground meat, fruit slices |
I didn’t expect to find myself smiling over a cookie scoop, but this KitchenAid KO148OHOBA surprised me with how much it streamlined my baking routine. The moment I squeezed the handle, I was reminded how satisfying it is to get perfectly uniform dough balls without any mess or fuss.
The stainless steel construction feels solid and premium in your hand. It’s hefty enough to feel durable, yet easy to maneuver.
The soft-grip handle adds comfort, so I didn’t feel any strain, even after scooping a dozen cookies or meatballs.
The spring-loaded mechanism works smoothly, releasing the dough with just a gentle squeeze. I tested it with thick sugar cookie dough, and it glided through effortlessly—no sticking, no tearing.
It measures about 1.5 tablespoons, which is just right for consistent-sized cookies.
What really surprised me is how easy it is to clean—just pop it in the dishwasher, and you’re done. The long 8-1/4 inch handle gives good leverage, making it comfortable to scoop larger amounts without feeling awkward.
If you’re into baking or meal prep, this tool is a game changer. It saves time and keeps your hands clean, especially when working with sticky dough.
Plus, it’s versatile enough for fruit, meat, or even portioning out mashed potatoes.
Overall, this scoop feels well-made, reliable, and genuinely helpful in the kitchen. It’s a small upgrade that makes a big difference in how you handle dough and other ingredients.
What is the Best KitchenAid Attachment for Sugar Cookies?
The best KitchenAid attachment for sugar cookies is the Flat Beater. The Flat Beater efficiently mixes ingredients, producing a smooth dough ideal for sugar cookies. According to KitchenAid, the Flat Beater is specifically designed for mixing and blending batters and doughs.
The KitchenAid website describes the Flat Beater as a versatile tool for various mixing tasks. It helps incorporate sugar and butter, ensuring a creamy consistency crucial for sugar cookie recipes. This attachment also minimizes the need for manual mixing, saving time.
Different factors contribute to why the Flat Beater is optimal for sugar cookies. It allows for uniform mixing of ingredients, which leads to consistent dough texture and flavor. The design prevents ingredients from sticking to the bowl, promoting even mixing.
KitchenAid notes that using the Flat Beater increases baking efficiency. Many home bakers report improving their cookie outcomes with this attachment, emphasizing its role in achieving perfect sugar cookies.
The broader significance of using appropriate attachments like the Flat Beater includes producing higher-quality baked goods, enhancing home baking skills, and increasing productivity. Improved baking can lead to greater satisfaction among home cooks and more successful baking experiences.
Baking with the correct tools positively affects mental well-being, dietary habits, and social interactions, enhancing the enjoyment of baked treats during gatherings.
Specific examples of impacts include more cookie recipes being successfully executed and increased enjoyment from baking for personal and social occasions.
To ensure successful sugar cookie preparation, KitchenAid recommends using the Flat Beater attachment with compatible mixers and following their guidelines for mixing times.
Best practices include checking dough consistency regularly and using parchment paper for easy cookie transfer, ensuring optimal baking results.
How Does the Paddle Beater Enhance the Mixing of Sugar Cookie Dough?
The paddle beater enhances the mixing of sugar cookie dough by efficiently combining the ingredients. It consists of solid, flat blades that provide a broad mixing surface. This design allows the paddle to incorporate butter and sugar smoothly, creating a creamy mixture. The paddle’s shape also helps to blend in flour and other dry ingredients evenly, preventing clumps.
As the mixer operates, the paddle rotates and moves through the dough. This action aerates the mixture, which adds lightness to the cookies. The constant movement ensures that all ingredients reach a uniform consistency. Consequently, the paddle beater produces a well-mixed dough, which leads to evenly baked sugar cookies. Overall, the paddle beater optimizes the mixing process and enhances the quality of the final product.
Why Should You Choose the Paddle Beater Over Other KitchenAid Attachments for Sugar Cookies?
Choosing the paddle beater for sugar cookies is beneficial due to its efficiency in thoroughly mixing ingredients. The paddle beater, or flat beater, creates a consistent dough texture by incorporating air and breaking down sugar granules effectively.
The KitchenAid website defines the paddle beater as an attachment designed for mixing, creaming, and beating. It is particularly effective for cookie dough, as it combines both dry and wet ingredients without overworking them.
One reason to choose the paddle beater is its ability to handle thicker doughs. Sugar cookie dough often contains butter, sugar, and flour, which need to be creamed together properly. The paddle beater generates a beating action that mixes ingredients evenly, which leads to a uniform dough. It minimizes the risk of over-mixing, which can occur with other attachments.
Another reason is its efficiency in incorporating air into the mixture. Incorporating air helps to create a light texture in sugar cookies. The paddle beater’s design allows for optimal contact with the bowl’s sides and bottom, ensuring thorough mixing. This results in a better rise and consistency in the final product.
Specific scenarios highlight the paddle beater’s advantages. For example, if you are baking a large batch of sugar cookies, the paddle beater can handle the volume better than a whisk attachment. Furthermore, avoiding excess gluten development is crucial for cookies. The paddle beater mixes ingredients efficiently without causing the dough to become tough.
When you use the paddle beater, ensure the mixer is set to lower speeds when incorporating dry ingredients. This prevents flour dust from clouding the air. Additionally, consider using room temperature butter for easier creaming. This condition ensures that the butter blends effectively with sugar, creating a proper base for your sugar cookies.
What Techniques Can Optimize Your Mixing Process for Sugar Cookies?
To optimize your mixing process for sugar cookies, consider utilizing specific techniques aimed at achieving the best texture and flavor.
- Use room temperature ingredients
- Cream butter and sugar properly
- Incorporate dry ingredients gradually
- Avoid overmixing
- Chill the dough before baking
- Use the right mixing tools
- Monitor mixing speed
Transitioning from these techniques, let’s explore each one in detail to understand how they impact the mixing process for sugar cookies.
-
Using room temperature ingredients: Using room temperature ingredients, such as butter and eggs, enhances the mixing process. Ingredients at room temperature blend more easily, resulting in a smoother dough. This technique allows for better incorporation of air, leading to a lighter texture in the baked cookies.
-
Creming butter and sugar properly: Creaming butter and sugar properly forms the foundation of sugar cookies. This process aerates the mixture, creating tiny air pockets that expand while baking. Successful creaming results in cookies that are chewy and have a desirable texture. Experts recommend creaming for about 3-5 minutes until light and fluffy.
-
Incorporating dry ingredients gradually: Incorporating dry ingredients gradually prevents clumping and ensures an even distribution within the dough. Gradual addition allows for better absorption of flour and other dry components, resulting in uniform texture and flavor. This technique also minimizes the risk of overmixing.
-
Avoiding overmixing: Avoiding overmixing is crucial for maintaining the desired texture of sugar cookies. Overmixing can develop gluten in the dough, leading to dense cookies. Mixing just until combined helps keep the cookies tender and light.
-
Chilling the dough before baking: Chilling the dough before baking can enhance production by firming up the fat content and improving overall flavor. Chilled dough holds its shape better during baking and can lead to a thicker, more consistent cookie. Many bakers recommend chilling for at least 30 minutes.
-
Using the right mixing tools: Using the right mixing tools, such as a stand mixer or hand mixer, can streamline the process of mixing sugar cookie dough. A stand mixer offers consistent power and speed, allowing for hands-free mixing. Choosing the appropriate attachment, such as the paddle attachment, can improve the texture by mimicking traditional hand mixing.
-
Monitoring mixing speed: Monitoring mixing speed ensures proper incorporation without compromising texture. Low to medium speeds are often recommended for mixing cookie dough. Higher speeds may introduce too much air and alter the intended outcome of the cookies.
Implementing these techniques can significantly enhance the mixing process for sugar cookies, leading to delicious results.
How Can You Achieve an Ideal Sugar Cookie Consistency with Your KitchenAid?
To achieve an ideal sugar cookie consistency with your KitchenAid mixer, focus on four key factors: proper ingredient ratios, optimal mixing technique, appropriate mixing speed, and suitable chilling time.
Ingredient ratios are critical for the right dough. Use a typical ratio of butter, sugar, flour, and egg. A recipe might suggest 1 cup of butter, 1 cup of sugar, 3 cups of flour, and 1 egg. This balance creates a soft, manageable dough.
Mixing technique influences the texture. Start by creaming the butter and sugar together until light and fluffy. This should take about 2 to 3 minutes on medium speed. This process incorporates air, leading to a lighter cookie.
Optimal mixing speed is important. Use medium to medium-low speed once you add the flour. Overmixing can lead to tough cookies due to gluten formation. Mix just until the flour is incorporated and the dough is uniform.
Chilling time affects dough firmness. Refrigerate the dough for at least 30 minutes before rolling it out. Chilling solidifies the fat, which helps cookies retain their shape during baking. It also enhances flavor development.
By concentrating on these factors during preparation, you can effectively achieve the desired consistency in your sugar cookies using a KitchenAid mixer.
What Common Mistakes Should You Avoid When Using a KitchenAid for Sugar Cookies?
The common mistakes to avoid when using a KitchenAid for sugar cookies include improper ingredient measurement, neglecting to scrape the bowl, overmixing dough, using the wrong attachment, and not chilling the dough.
- Improper ingredient measurement
- Neglecting to scrape the bowl
- Overmixing dough
- Using the wrong attachment
- Not chilling the dough
Avoiding these mistakes enhances your experience while using a KitchenAid for sugar cookies and leads to better results.
-
Improper Ingredient Measurement:
Improper ingredient measurement occurs when bakers fail to use accurate tools or techniques to measure flour, sugar, and other components. For instance, using a cup to scoop flour can pack it too tightly, leading to denser cookies. The American Culinary Federation emphasizes using a kitchen scale for precise measurements to maintain consistency in baking. Studies show that accurate ingredient ratios significantly affect cookie texture and taste. -
Neglecting to Scrape the Bowl:
Neglecting to scrape the bowl means failing to incorporate all ingredients evenly. Dough can stick to the sides, leading to uneven mixing. This can result in patches of flour or sugar remaining unblended. A simple practice is to pause mixing and use a spatula to scrape down the sides before continuing. Experts recommend doing this to ensure each batch produces uniformly baked cookies. -
Overmixing Dough:
Overmixing dough happens when bakers extend the mixing time beyond what’s necessary. This action develops gluten, making the cookies tough instead of tender. Baking experts suggest mixing only until ingredients are combined, especially after adding flour. According to Baking Illustrated, dough should remain slightly crumbly before chilling to yield optimal texture in the final product. -
Using the Wrong Attachment:
Using the wrong attachment refers to choosing an incompatible beater for the mixing task. For sugar cookies, the flat beater is ideal for incorporating the ingredients efficiently. Using the wire whisk, for example, can cause the dough to become airy and fluffy—contrary to the desired dense texture. The KitchenAid user manual provides clear recommendations for which attachment suits various baking tasks. -
Not Chilling the Dough:
Not chilling the dough can lead to cookies spreading excessively during baking. Chilling firms up the fat before baking, reducing spread and allowing for better shape retention. Renowned bakers like David Lebovitz recommend chilling dough for at least 30 minutes or longer for the best results. This practice enhances flavor development and results in thicker cookies.
How Can You Effectively Clean and Maintain Your KitchenAid Paddle Beater for Best Results?
To effectively clean and maintain your KitchenAid paddle beater for best results, follow these straightforward steps: hand wash immediately after use, periodically deep clean, avoid abrasive cleaners, and store properly.
-
Hand washing: Rinse the paddle beater under warm water immediately after using it. This prevents food residue from hardening and makes cleaning easier. Use mild dish soap and a soft sponge to clean it thoroughly. Avoid immersing it in water for long periods.
-
Deep cleaning: Perform a deeper clean every few weeks, especially if you use the beater frequently. Soak the paddle beater in warm soapy water for about 15-20 minutes to loosen any stubborn residue. After soaking, scrub carefully with a soft brush, paying attention to any crevices.
-
Avoiding abrasive cleaners: Do not use steel wool, harsh chemicals, or abrasive sponges. These can scratch the surface of the beater and may contaminate food. Stick to non-abrasive sponges and natural cleaning solutions to maintain its integrity.
-
Proper storage: Store the paddle beater in a clean, dry place. Hanging it up or placing it in a designated container can keep it dust-free. Avoid storing it with heavy items that could bend or damage it.
Regular maintenance prolongs the life of the paddle beater and ensures optimal performance during baking.
Related Post: