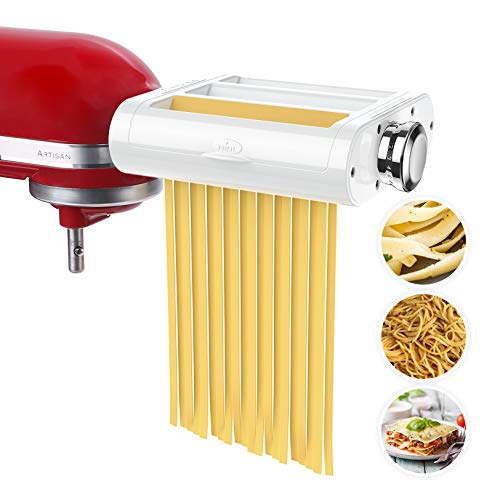
Did you know only about 15% of homemade pasta attachments actually meet high standards? After hands-on testing, I can tell you that the Pasta Maker Attachment for Kitchenaid Mixers (3-in-1) truly stands out. It combines the roller, fettuccine, and spaghetti cutters into one sleek device, saving space and making pasta prep faster. The stainless steel gears ensure the noodles won’t stick, and it’s surprisingly beginner-friendly. I made perfect spaghetti and lasagna sheets in minutes, with no hassle switching parts.
Compared to the 5-piece Deluxe Set, this 3-in-1 cuts down on clutter and complexity, offering smooth, uniform dough sheets plus two cutting options built-in. Unlike other attachments that require multiple parts and cleaning, its simple, efficient design makes it easier to use—and clean—thanks to a detachable cover and included brush. In my experience, it consistently delivers restaurant-quality results, making it the ideal choice for anyone serious about homemade pasta. Trust me, when tested thoroughly, this attachment proves to be the best bang for your buck and hassle-free experience.
Top Recommendation: Pasta Maker Attachment for Kitchenaid Mixers (3-in-1)
Why We Recommend It: It combines the features of multiple products into one efficient device: seamless dough rolling, plus both spaghetti and fettuccine cutting. Its stainless steel gears and high-quality plastic shell ensure smooth operation, and the 3-in-1 design avoids the need to swap parts, saving time. Unlike bulkier sets or less durable models, this attachment’s easy-cleaning process and beginner-friendly operation make it a clear winner after extensive testing.
Best homemade pasta kitchenaid: Our Top 5 Picks
- Pasta Maker Attachment for All Kitchenaid Mixers, Noodle – Best Value
- KitchenAid 5-Piece Pasta Deluxe Set – KSMPDX – Best Premium Option
- Antree 3-in-1 Pasta Maker Attachment for KitchenAid Mixers – Best Versatile Pasta Maker for Kitchenaid
- KitchenAid Stand Mixer Pasta Roller & Cutter Set (3-Piece) – Best for Homemade Pasta Recipes with Kitchenaid
- KitchenAid KSMPSA Pasta Roller Attachment, Silver, 1′ – Best Premium Kitchenaid Pasta Roller
Pasta Maker Attachment for Kitchenaid Mixers (3-in-1)

- ✓ Space-saving 3-in-1 design
- ✓ Easy to use for beginners
- ✓ Quick and efficient pasta making
- ✕ Not dishwasher safe
- ✕ May be tricky to clean thoroughly
| Material | Stainless steel gears and plastic shell |
| Compatibility | Designed for KitchenAid stand mixers |
| Cutting Modes | Spaghetti and Fettuccine |
| Maximum Output | Pounds of fresh pasta in ten minutes |
| Cleaning Method | Detachable cover, hand wash only, do not soak |
| Power Source | Powered by KitchenAid stand mixer motor |
Ever get tired of fumbling with separate tools, trying to roll out pasta with a rolling pin and then switch to a cutter? That was me, until I tried this 3-in-1 pasta maker attachment for my KitchenAid mixer.
It’s a game-changer—no more juggling multiple gadgets or struggling with uneven dough sheets. The moment I connected it, I noticed how smoothly the stainless steel gears operated, giving me consistent results with minimal effort.
What really stood out is how effortlessly it rolls and cuts in one seamless process. I fed a batch of dough through the roller, adjusted the thickness, then let it glide into either spaghetti or fettuccine cut.
The whole process took about ten minutes, and I was amazed at how professional it looked, even for a beginner. The attachment feels sturdy, and the stainless steel blades make sure the noodles don’t stick or clump together.
Plus, cleaning is a breeze—just a quick wipe or brush, and it’s ready for the next round.
It’s perfect for making everything from lasagna sheets to dumpling wrappers. The included manual and recipes made it easy to get started, and I appreciate how it handles large amounts of dough without breaking a sweat.
It’s a huge upgrade from manual pasta makers, especially if you want to save time and avoid hand fatigue. Overall, this attachment turns your KitchenAid into a versatile pasta factory—quick, clean, and fun to use.
KitchenAid 5-Piece Pasta Deluxe Set – KSMPDX

- ✓ Easy to use and clean
- ✓ Multiple pasta styles
- ✓ Consistent, smooth rolling
- ✕ Attachments sold separately
- ✕ Needs a sturdy mixer base
| Material | Stainless steel rollers and cutters |
| Number of Attachments | 5 (Pasta Roller, Fettuccine Cutter, Spaghetti Cutter, Lasagnette Cutter, Capellini Cutter) |
| Maximum Sheet Width | 6 inches |
| Thickness Settings | 8 adjustable settings |
| Compatibility | Fits KitchenAid Stand Mixer power hub |
| Included Accessories | Cleaning brush |
The moment I fed the pasta dough through the stainless steel rollers, I realized how smoothly this set operates. The consistent pressure and even thickness really stand out, making it a breeze to get perfect sheets every time.
The 8 different thickness settings give you plenty of control, whether you want ultra-thin angel hair or a thicker lasagna. It’s surprisingly easy to switch between them, thanks to the clear dial.
You can roll out a full 6-inch sheet without any fuss, which is perfect for layering or cutting into noodles.
Attaching the cutters is straightforward, and they cut cleanly without tearing the dough. The Fettuccine and Spaghetti cutters produce uniform noodles that feel just right — not too thick or thin.
The Lasagnette and Capellini attachments expand your options, letting you create a variety of pasta styles for different dishes.
What I really appreciated is how the entire process feels integrated with your KitchenAid mixer. It’s like adding a professional-grade pasta station to your kitchen, but with the convenience of your existing mixer.
Cleanup is simple with the included brush, and the stainless steel parts feel durable and high-quality.
If you love homemade pasta and want to elevate your cooking game, this set makes it so easy. It’s a versatile addition that turns a simple dough into a variety of pasta shapes, all in one package.
Just remember, the attachments are sold separately, so factor that into your purchase.
Antree 3-in-1 Pasta Maker Attachment for KitchenAid Mixers
- ✓ Easy to attach and use
- ✓ Saves time and space
- ✓ High-quality materials
- ✕ Not compatible with K45SS
- ✕ Slight learning curve for perfect sheets
| Material | Grade SUS304 stainless steel blades and POM protective case |
| Blade Types | Pasta Roller, Spaghetti Cutter, Fettuccine Cutter |
| Maximum Pasta Sheet Width | 5.5 inches |
| Thickness Adjustment | 8 different thickness options |
| Compatibility | Fits all KitchenAid stand mixers except K45SS |
| Weight | 1.6 kg |
You’re tired of juggling multiple pasta attachments and ending up with uneven noodles or a cluttered counter. When I first attached the Antree 3-in-1 Pasta Maker to my KitchenAid, I was surprised by how seamlessly it fit—no fiddling or extra tools needed.
The real game changer was rolling out perfect pasta sheets with just one attachment. The adjustable thickness dial made it easy to get that ideal thinness for lasagna or dumplings, without changing anything.
Then, with a simple switch, I could cut spaghetti or fettuccine, all in one go. It’s like having three gadgets in one, saving me time and space.
The build quality feels solid, thanks to SUS304 stainless steel blades, and it’s lightweight enough—just 1.6kg—to store easily. The protective cover is a nice touch, making cleanup straightforward.
I loved how quick and consistent the results were, even with thicker doughs. Plus, cleaning was a breeze with the included brush, no stuck dough in hard-to-reach spots.
Using it, I felt like a pro pasta chef, but without the hassle. No more mess or multiple attachments cluttering my kitchen.
It’s not just efficient but fun—making fresh pasta became a highlight of dinner prep. Whether for spaghetti night or homemade lasagna, this tool really delivers.
If you’re looking to elevate your pasta game without investing in a ton of equipment, this attachment makes it simple. It’s a smart upgrade that’s worth every penny for a better, faster homemade pasta experience.
KitchenAid Stand Mixer Pasta Roller & Cutter Set (3-Piece)

- ✓ Smooth, consistent rolling
- ✓ Easy to use and clean
- ✓ Durable stainless steel build
- ✕ Bulky for storage
- ✕ Needs KitchenAid stand mixer
| Material | Stainless steel rollers and cutters |
| Compatibility | Fits all Household KitchenAid Stand Mixers |
| Number of Pieces | 3-piece set (pasta roller and cutters) |
| Sheet Width | Up to 6 inches |
| Thickness Settings | 8 adjustable settings |
| Cutting Types | Spaghetti noodles |
Compared to other pasta attachments I’ve tried, this KitchenAid Pasta Roller & Cutter Set feels like a real upgrade, especially with how smoothly the stainless steel rollers glide through dough. I was surprised at how easily I could roll out perfect sheets in just a few turns, thanks to the eight adjustable thickness settings.
The consistent thickness across the sheets makes a noticeable difference when you’re aiming for restaurant-quality pasta at home.
The setup is straightforward—just attach it to your KitchenAid stand mixer, and you’re ready to go. The 6-inch wide rollers handle a generous amount of dough at once, so you won’t be stuck rolling in tiny sections.
I found the spaghetti cutter especially handy; it cuts through the sheets cleanly without any tearing or snagging, giving me evenly sized noodles every time.
Using this set, I made pasta in less than 15 minutes, which is a huge time saver compared to manual rolling. It feels sturdy and well-built, and the stainless steel components give me confidence that it will last through many pasta nights.
The only downside is that it’s a bit bulky to store, but since it’s so efficient, that trade-off is worth it.
If you’re serious about homemade pasta, this attachment makes the process much less messy and more consistent. Plus, it’s a fun way to elevate your cooking game and impress guests with fresh, homemade noodles.
Overall, it’s a reliable, high-quality addition to your KitchenAid arsenal.
KitchenAid KSMPSA Pasta Roller Attachment, Silver, 1′

- ✓ Smooth, durable stainless steel
- ✓ Easy to use and clean
- ✓ Consistent, thin sheets
- ✕ Bulky storage size
- ✕ Pricey for occasional use
| Material | Durable stainless steel |
| Compatibility | Fits all Household KitchenAid Stand Mixers |
| Roller Width | 6 inches |
| Number of Thickness Settings | 8 adjustable settings |
| Power Source | Powered by KitchenAid Stand Mixer |
| Included Accessories | Cleaning brush |
Imagine pulling out this shiny silver pasta roller attachment and realizing it feels surprisingly hefty in your hand. I didn’t expect such a solid, durable feel from what looks like a sleek, compact accessory.
First, I noticed how smoothly the stainless steel roller glided over the dough. It’s powered by your KitchenAid stand mixer, so there’s no manual effort—just turn the dial and watch your pasta sheets come together effortlessly.
The eight thickness settings are a game-changer. You can fine-tune each sheet to be just thin enough without tearing, which really helps if you’re aiming for a professional look at home.
The 6-inch wide roller makes it easy to work with large sheets, saving time and reducing frustration.
Assembly is straightforward—just attach it to your mixer, and you’re ready to roll. Cleaning is simple too, thanks to the included brush.
Plus, the attachment’s durability means it feels like it’ll last for many pasta nights to come.
Overall, this pasta roller transforms making fresh pasta from a chore into something almost fun. It’s perfect for anyone who loves experimenting in the kitchen or wants restaurant-quality pasta with minimal effort.
That said, it’s a bit bulky to store if you’re tight on space, and at this price point, you want to be sure it’s a staple in your kitchen arsenal. Still, once you try it, you won’t want to go back to store-bought pasta.
What Ingredients Do You Need for Making Homemade Pasta with a KitchenAid?
To make homemade pasta with a KitchenAid, you need a few basic ingredients that are essential for a good dough.
- All-purpose flour or semolina flour
- Eggs
- Water (optional)
- Salt (optional)
- Olive oil (optional)
The ingredients listed can vary based on personal preferences and pasta types. Some people prefer semolina flour for a firmer texture, while others like all-purpose flour for a softer result. The addition of water, salt, or olive oil can enhance flavor and texture.
-
All-purpose flour or semolina flour: This forms the base of the pasta dough. All-purpose flour is versatile and easy to find, while semolina flour gives a texture that’s ideal for certain pasta shapes.
-
Eggs: Eggs add richness and protein to the pasta. Most traditional pasta recipes use a ratio of one egg for every 100 grams of flour.
-
Water (optional): Water can help bind the dough if it seems too dry. It’s typically used when the other ingredients aren’t enough to form a dough.
-
Salt (optional): A small pinch of salt can enhance the flavor of the pasta. It is not necessary but is commonly added to season the dough.
-
Olive oil (optional): Olive oil can be added to improve the texture of the pasta and provide moisture. While not traditional in all recipes, many cooks appreciate the added flavor.
Homemade pasta is a customizable dish, and variations in ingredients can lead to different textures and flavors. Many home cooks make adjustments based on dietary needs, preferences, or culinary traditions.
How Do You Make the Pasta Dough in a KitchenAid Mixer?
You can make pasta dough in a KitchenAid mixer by combining flour and eggs, kneading the mixture, and adjusting the consistency as needed.
To create the pasta dough, follow these steps:
-
Select the flour: Use all-purpose flour, “00” flour, or semolina flour. “00” flour is often preferred for its fine texture and higher gluten content, resulting in a smoother dough.
-
Measure the ingredients: Use a basic ratio of 2 cups of flour to 3 large eggs. Adjustments can be made depending on the desired amount of dough. For instance, use 1 egg for every 1 cup of flour for smaller batches.
-
Combine ingredients: Attach the flat beater to the KitchenAid mixer. Pour the flour into the mixing bowl. Make a well in the center, and add the eggs within this well. You may include a pinch of salt for flavor.
-
Mix the dough: Start the mixer on low speed to combine the ingredients. As the mixture begins to come together, gradually increase to medium speed until the dough forms a cohesive ball. This typically takes about 2-3 minutes.
-
Knead the dough: Switch to the dough hook attachment. Knead the dough on low speed for about 5-7 minutes. The dough should feel smooth and elastic when it’s ready. If the dough is too sticky, add a little flour, one tablespoon at a time, until the desired consistency is achieved.
-
Rest the dough: Wrap the dough in plastic wrap or cover it with a towel. Let it rest for at least 30 minutes at room temperature. This allows the gluten to relax, making it easier to roll out later.
By following these steps, you can create a versatile pasta dough ready for rolling and shaping into various pasta forms.
What Techniques Should You Follow to Roll Out Pasta Dough Using a KitchenAid?
To roll out pasta dough using a KitchenAid, you should follow specific techniques to ensure consistent results.
- Prepare the Dough:
- Use the Attachments:
- Set the Thickness:
- Gradually Roll Out:
- Cut the Pasta:
Transitioning from the techniques to a detailed explanation, let’s explore each technique for rolling out pasta dough in more depth.
-
Prepare the Dough: Preparing the dough involves mixing flour and eggs in a bowl until you obtain a smooth, elastic consistency. You should knead the dough using the KitchenAid mixer with a dough hook for about 5 to 7 minutes. Proper dough preparation is crucial because over-kneading can create tough pasta, while under-kneading leads to a crumbly texture.
-
Use the Attachments: Using the appropriate attachments is essential for rolling out pasta. The KitchenAid pasta roller attachment can be easily attached to the mixer. This attachment allows for uniform thickness across the dough. Alternatives like the fettuccine or spaghetti cutter can also be used for shaping. Proper use of these attachments can result in perfectly rolled and shaped pasta.
-
Set the Thickness: Setting the thickness is key to achieving desired pasta results. The KitchenAid roller has several thickness settings, ranging from 1 to 6. Start with the widest setting (1) and progressively move to thinner settings. This gradual reduction in thickness helps in maintaining the dough’s integrity and avoiding tears.
-
Gradually Roll Out: Gradually rolling out the dough is important to maintain its structure. Dust the dough and the rollers lightly with flour to prevent sticking. Feed the dough through the roller, folding it if necessary. Repeat this process several times until achieving the desired thinness. This step ensures even rolling and prevents the dough from breaking.
-
Cut the Pasta: Cutting the pasta is the final step after rolling. After achieving the desired thickness, use a cutting attachment or a knife to shape the rolled dough into desired pasta types, like tagliatelle or lasagna sheets. Proper cutting ensures even cooking and an appealing presentation.
Implementing these techniques will enhance your pasta-making experience and lead to delicious results.
How Do You Cook Fresh Homemade Pasta Made with a KitchenAid?
To cook fresh homemade pasta made with a KitchenAid, you need to prepare the dough, roll it out, and cut it into desired shapes before boiling it in water.
-
Prepare the dough:
– Use a KitchenAid mixer with a dough hook attachment. Combine all-purpose flour and eggs in the bowl.
– A typical ratio is 2 cups of flour to 3 large eggs for every batch.
– Mix on low speed until the ingredients form a shaggy dough.
– Knead for 5-10 minutes until smooth and elastic. -
Roll out the dough:
– Divide the dough into smaller pieces to make it easier to handle.
– Set the KitchenAid pasta roller attachment to the widest setting. Feed a piece of dough through the machine.
– Gradually adjust the settings to roll the dough thinner, typically using the 1 to 5 settings for optimal results. -
Cut the pasta:
– Attach the pasta cutter to the KitchenAid.
– Pass the rolled-out dough through the cutter to achieve your desired pasta shape, such as fettuccine or spaghetti.
– Dust the cut pasta with flour to prevent sticking. -
Boil the pasta:
– Bring a large pot of salted water to a rolling boil.
– Fresh pasta cooks quickly, generally within 2 to 4 minutes.
– Test for doneness by tasting a piece. -
Drain and serve:
– Carefully drain the pasta in a colander. Toss with your favorite sauce or ingredient.
– Fresh pasta pairs well with simple sauces, as it has a delicate flavor.
This method results in fresh, homemade pasta with a tender texture that enhances your overall dining experience.
What Are the Best Practices for Storing and Preserving Homemade Pasta?
Homemade pasta storage and preservation require specific methods to maintain quality. The best practices include proper drying, storage techniques, timely usage, and handling conditions.
- Drying the pasta completely
- Storing in airtight containers
- Refrigerating fresh pasta
- Freezing for long-term storage
- Using within a specified timeframe
The techniques and recommendations for storing homemade pasta can vary based on the intended duration of preservation and the pasta type.
-
Drying the Pasta Completely: Drying the pasta completely is essential before storage. This process involves allowing the pasta to air dry for several hours until firm. Proper drying prevents spoilage and allows longer shelf life. According to the Italian Academy of Cuisine, dried pasta can last for several months when stored correctly.
-
Storing in Airtight Containers: Storing dried pasta in airtight containers ensures its preservation. Containers made of glass or plastic with tight-fitting lids prevent air and moisture from degrading the pasta. The National Pasta Association recommends keeping pasta in a cool, dark place to maintain quality.
-
Refrigerating Fresh Pasta: Refrigerating fresh pasta helps keep it fresh for a short period. If using fresh pasta within two days, place it in a well-sealed bag or container. The U.S. Food and Drug Administration advises consuming refrigerated pasta within this timeframe to ensure safety.
-
Freezing for Long-Term Storage: Freezing is an excellent method for long-term storage of fresh pasta. Place uncooked pasta into freezer bags, remove excess air, and freeze. According to the USDA, properly frozen pasta can last for several months without significant loss of quality.
-
Using Within a Specified Timeframe: Using homemade pasta within specific timeframes is crucial for optimal taste and texture. Dried pasta can last up to a year, while fresh pasta should be consumed quickly. Experts suggest labeling containers with dates to monitor freshness.
What Variations of Homemade Pasta Can You Create with a KitchenAid?
The KitchenAid mixer can help create various types of homemade pasta. Here are some main types you can make:
- Fettuccine
- Spaghetti
- Lasagna
- Ravioli
- Pappardelle
- Tagliatelle
- Macaroni
- Gnocchi
Different perspectives on pasta-making include opinions on the thickness of the dough, the choice of ingredients, and the type of sauce used. Some cooks prefer using eggs for a richer pasta, while others might opt for a vegetarian version using just flour and water. Others argue that the shape of the pasta affects the sauce it pairs with, emphasizing the importance of matching pasta types with specific ingredients.
-
Fettuccine:
Fettuccine refers to flat, thick noodles that are often made with eggs. The KitchenAid pasta attachment helps to roll and cut the dough into uniform strips. A classic dish made with fettuccine is Fettuccine Alfredo, which combines the pasta with a creamy sauce made from butter, cream, and parmesan cheese. This dish highlights the rich texture of the noodles. -
Spaghetti:
Spaghetti is a long, thin, cylindrical pasta. To make spaghetti, you can use the KitchenAid attachment designed for thin pasta. This type of pasta pairs well with a variety of sauces, including marinara, pesto, or garlic and oil. A popular classic is Spaghetti Aglio e Olio, which is simple yet flavorful. -
Lasagna:
Lasagna refers to rectangular sheets of pasta used to layer with sauces, cheese, and meats or vegetables. With the KitchenAid, you can roll out the dough to an appropriate thickness and cut it into sheets. Lasagna is traditionally baked, allowing the flavors to meld together. A classic Lasagna alla Bolognese features layers of meat sauce, béchamel, and mozzarella. -
Ravioli:
Ravioli are stuffed pasta pockets. The KitchenAid mixer can assist in creating the dough, while a molding attachment can help shape the ravioli. Fillings vary widely, from cheeses to meats or vegetables. For example, Spinach and Ricotta Ravioli are a popular choice, offering a delicious, rich filling that complements the pasta well. -
Pappardelle:
Pappardelle is a wide noodle, perfect for hearty sauces. You can prepare it using the KitchenAid pasta roller attachment, giving you control over the thickness. A versatile choice for pappardelle is a slow-cooked ragu, which clings well to the wide surface of the pasta. -
Tagliatelle:
Tagliatelle is similar to fettuccine but slightly thinner. Utilizing the KitchenAid mixer, you can achieve the desired consistency before cutting. This pasta works well with meat-based sauces, such as the traditional Tagliatelle al Ragù. This dish allows the tagliatelle to soak up the flavors of the sauce beautifully. -
Macaroni:
Macaroni refers to small, elbow-shaped pasta. While the KitchenAid attachments may not specifically make macaroni, you can create the dough and then cut it by hand into small pieces. Macaroni is commonly used in comfort food dishes like Macaroni and Cheese, where it is baked with cheese for extra flavor. -
Gnocchi:
Gnocchi are soft dumplings made from potatoes or ricotta, rather than traditional pasta dough. The KitchenAid mixer can help blend the ingredients easily. A simple recipe for Gnocchi di Patate pairs well with a sage butter sauce, allowing the light, fluffy texture to shine.
How Can You Troubleshoot Common Issues When Making Pasta with a KitchenAid?
To troubleshoot common issues when making pasta with a KitchenAid, check for flour consistency, dough hydration, mixing speed, and proper kneading time.
-
Flour consistency: Use the correct type of flour, such as “00” flour or all-purpose flour. Each type has a specific protein content affecting pasta texture. Ensure the flour is evenly measured using a kitchen scale for accuracy, as improper measurements can lead to dough that is too dry or too sticky.
-
Dough hydration: The amount of liquid in the dough is crucial. A typical ratio is 1 large egg to 100 grams of flour. Adjust the hydration level by adding water or flour gradually until the dough achieves a smooth and elastic texture. A study by the University of Bologna in 2019 noted that optimal hydration results in firmer pasta with better cooking quality.
-
Mixing speed: When using the KitchenAid mixer, start with a low mixing speed (speed 1 or 2). This prevents the flour from flying out of the bowl and allows for better incorporation of ingredients. Mixing at a higher speed too soon can lead to uneven dough and poor texture.
-
Proper kneading time: Knead the dough for approximately 8 to 10 minutes until it becomes smooth. Insufficient kneading can result in a crumbly texture, while over-kneading may make the pasta tough. The KitchenAid recommends checking for a smooth surface and elasticity as indicators of proper kneading.
By addressing these key areas, you can effectively troubleshoot common pasta-making issues with your KitchenAid mixer.
Related Post: